How to Photograph the Northern Lights on a Samsung Galaxy
Samsung Pro mode settings for the northern lights: shutter speed, ISO, manual focus and white balance, plus when to look, how to frame and how to edit.
Auto mode will struggle the most with an aurora, as these are generally very dynamic (moving around quite a bit) and can be quite dim.
That said, you can still shoot beautiful (often even more colourful than what you see with your own eyes!) aurora images on your Galaxy phone. Just try to take control of the exposure and keep your phone as steady as possible.

Starting settings for Pro mode
Start with these values for your first frame of the night, as they’re pretty standard for shooting aurora and within the parameters of Samsung’s Pro mode, and adjust as needed for each frame.
| Setting | Faint or slow aurora | Bright, fast-moving aurora | Why |
|---|---|---|---|
| Lens | 1x main camera | 1x main camera | The main camera has the brightest lens and the biggest sensor on the phone |
| Focus | Manual, at infinity | Manual, at infinity | Autofocus hunts in the dark and can lock onto nothing |
| ISO | 1600, up to 3200 if very faint | 800 to 1600 | Higher ISO brightens the frame but adds grain |
| Shutter | 10 to 15 seconds | 2 to 5 seconds | Long exposures smooth moving curtains into an even band |
| White balance | 3500 to 4000K | 3500 to 4000K | A fixed value keeps the colour the same from frame to frame |
| Format | RAW and JPEG | RAW and JPEG | A DNG leaves far more room to fix noise and colour |
| Timer | 2 seconds | 2 seconds | Pressing the shutter shakes the phone as the exposure starts |
Some (but not all) Galaxy phones in the A and M series only allow for 10-second exposures, or don’t even have a shutter control. With a 10-second limit, try using the entire 10 seconds available and also increase the ISO to 1600 or even 3200 to compensate.
Newer flagship Galaxy phones allow for exposures of up to 30 seconds in Pro mode. Check what’s available on your phone before you head out!
What to sort out before you leave
- For exposures of 10 seconds or more, a tripod is almost essential to avoid smearing the stars due to movement. Even a tripod for phones or clamping your phone to a fence post is enough.
- Have your phone’s battery charged and bring a power bank (keep it in an inside pocket, as batteries drain quicker in the cold).
- Make sure to clean your lenses before setting up. Fingerprints on the lens can make halos around stars and brighter parts of an aurora, and a scratched lens protector does the same.
- Enable RAW images in Pro mode (in addition to JPEG) so that Pro mode will also save a DNG file. In One UI 9 and on the S26 series, this is under Camera settings, Photo format, Pro mode picture format. One UI 7 has it under Advanced picture options. The RAW vs JPEG guide describes what you'll get from that file.
- Lower the brightness of your phone’s screen to help your eyes adjust to the darkness (and avoid judging exposures based on a too-bright preview).

Setting up Pro mode, step by step
- 1
Open Pro mode on the 1x camera
Use the 1x lens (it’ll be able to collect the most light, since it’s the main camera). Only use the ultra-wide if the aurora is filling the entire view and the display is bright. Tap More on the bar of camera modes, then Pro in the Camera app.
- 2
Set focus to infinity
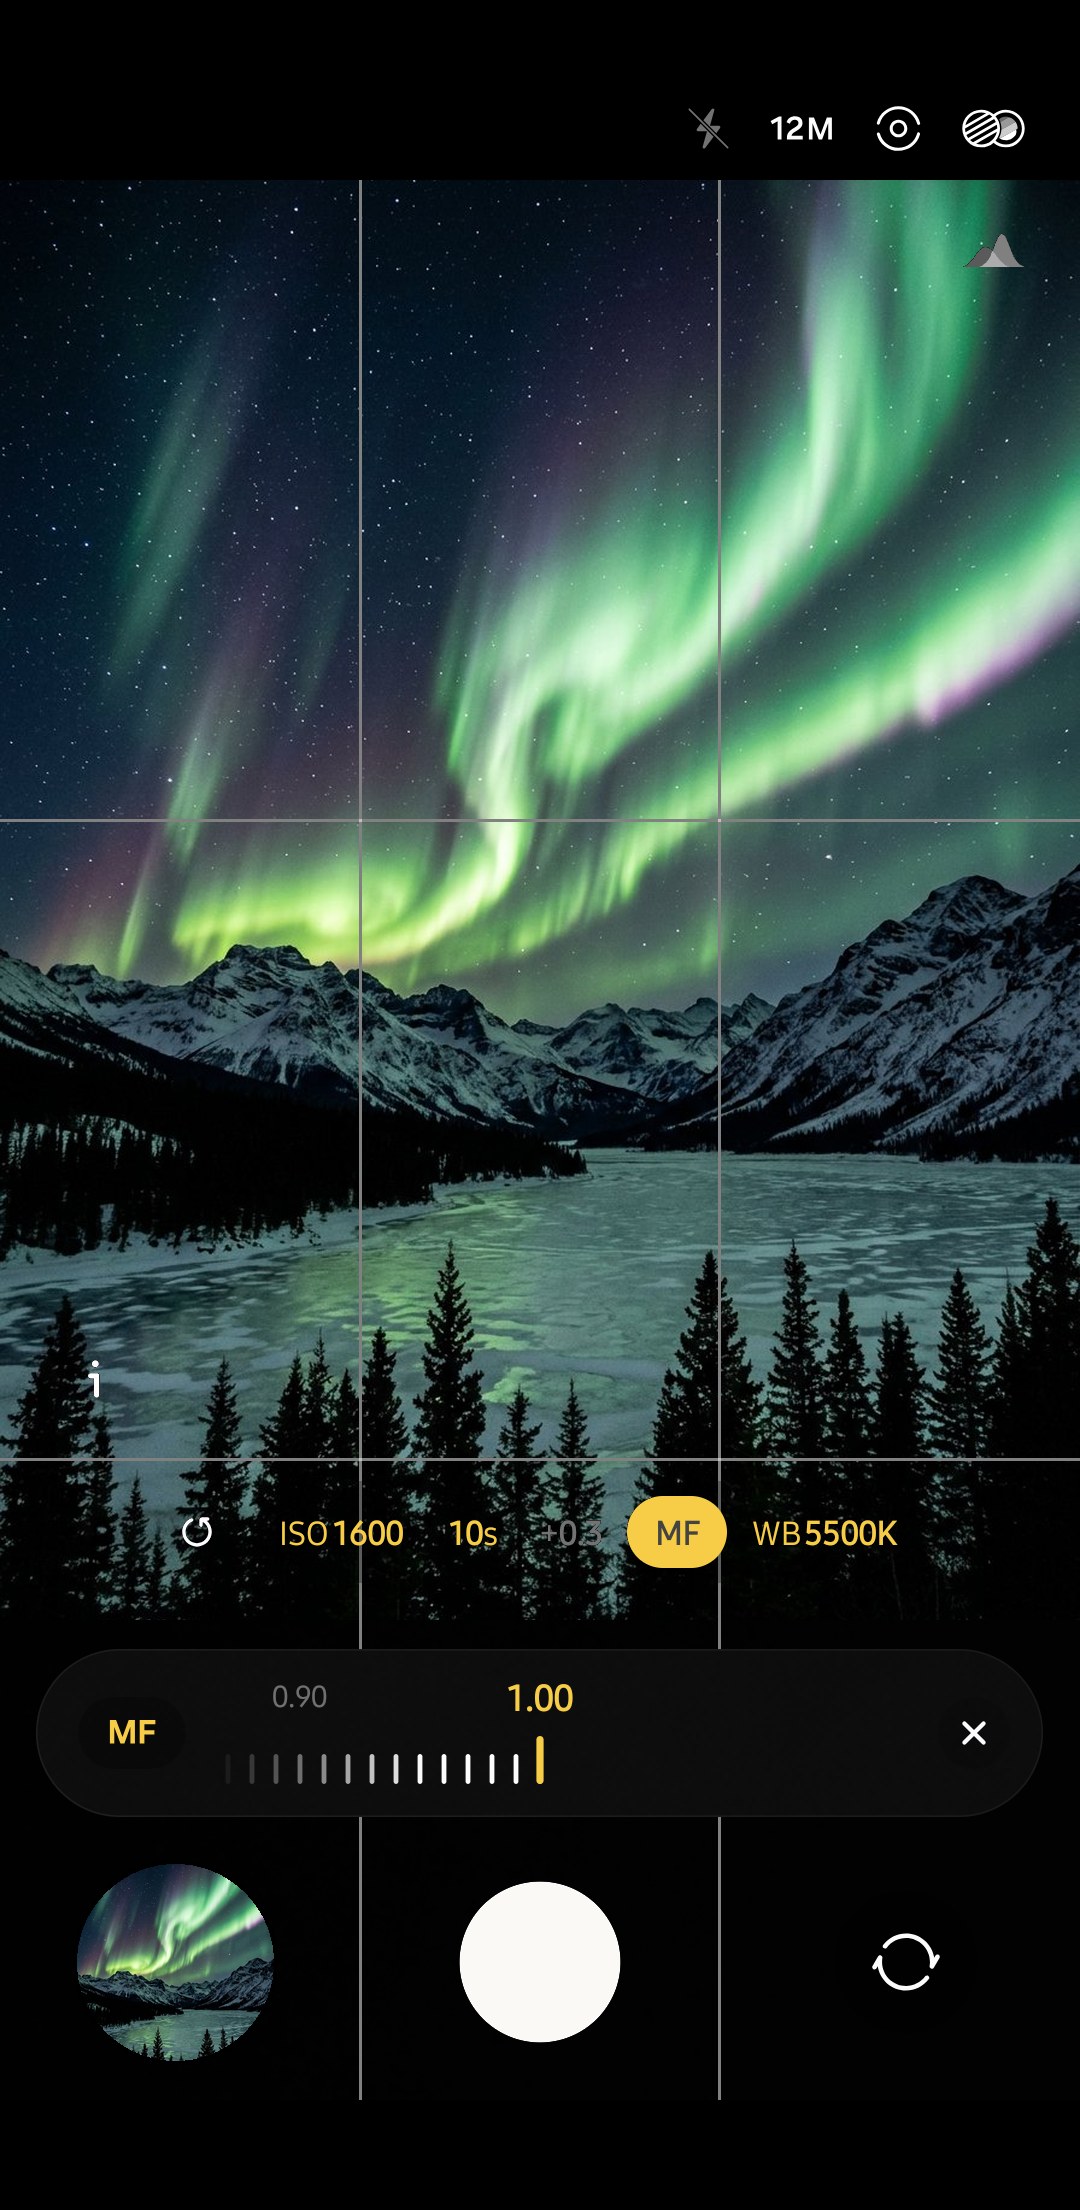
Switch from autofocus to manual focus by tapping the focus button, then drag all the way to infinity (farthest focus). Take a photo and view it in Gallery. Zoom into a star. If it’s not a pinpoint (but rather a blob), try moving the focus slider ever so slightly from infinity and repeat until you find sharp stars. If available, enable focus peaking to help find your focus (this will highlight in colour the in-focus areas of your shot). On One UI 9 you’ll find this under Camera Assistant as a switch called Focus peaking (only available in the Pro modes).
- 3
Set ISO and shutter speed
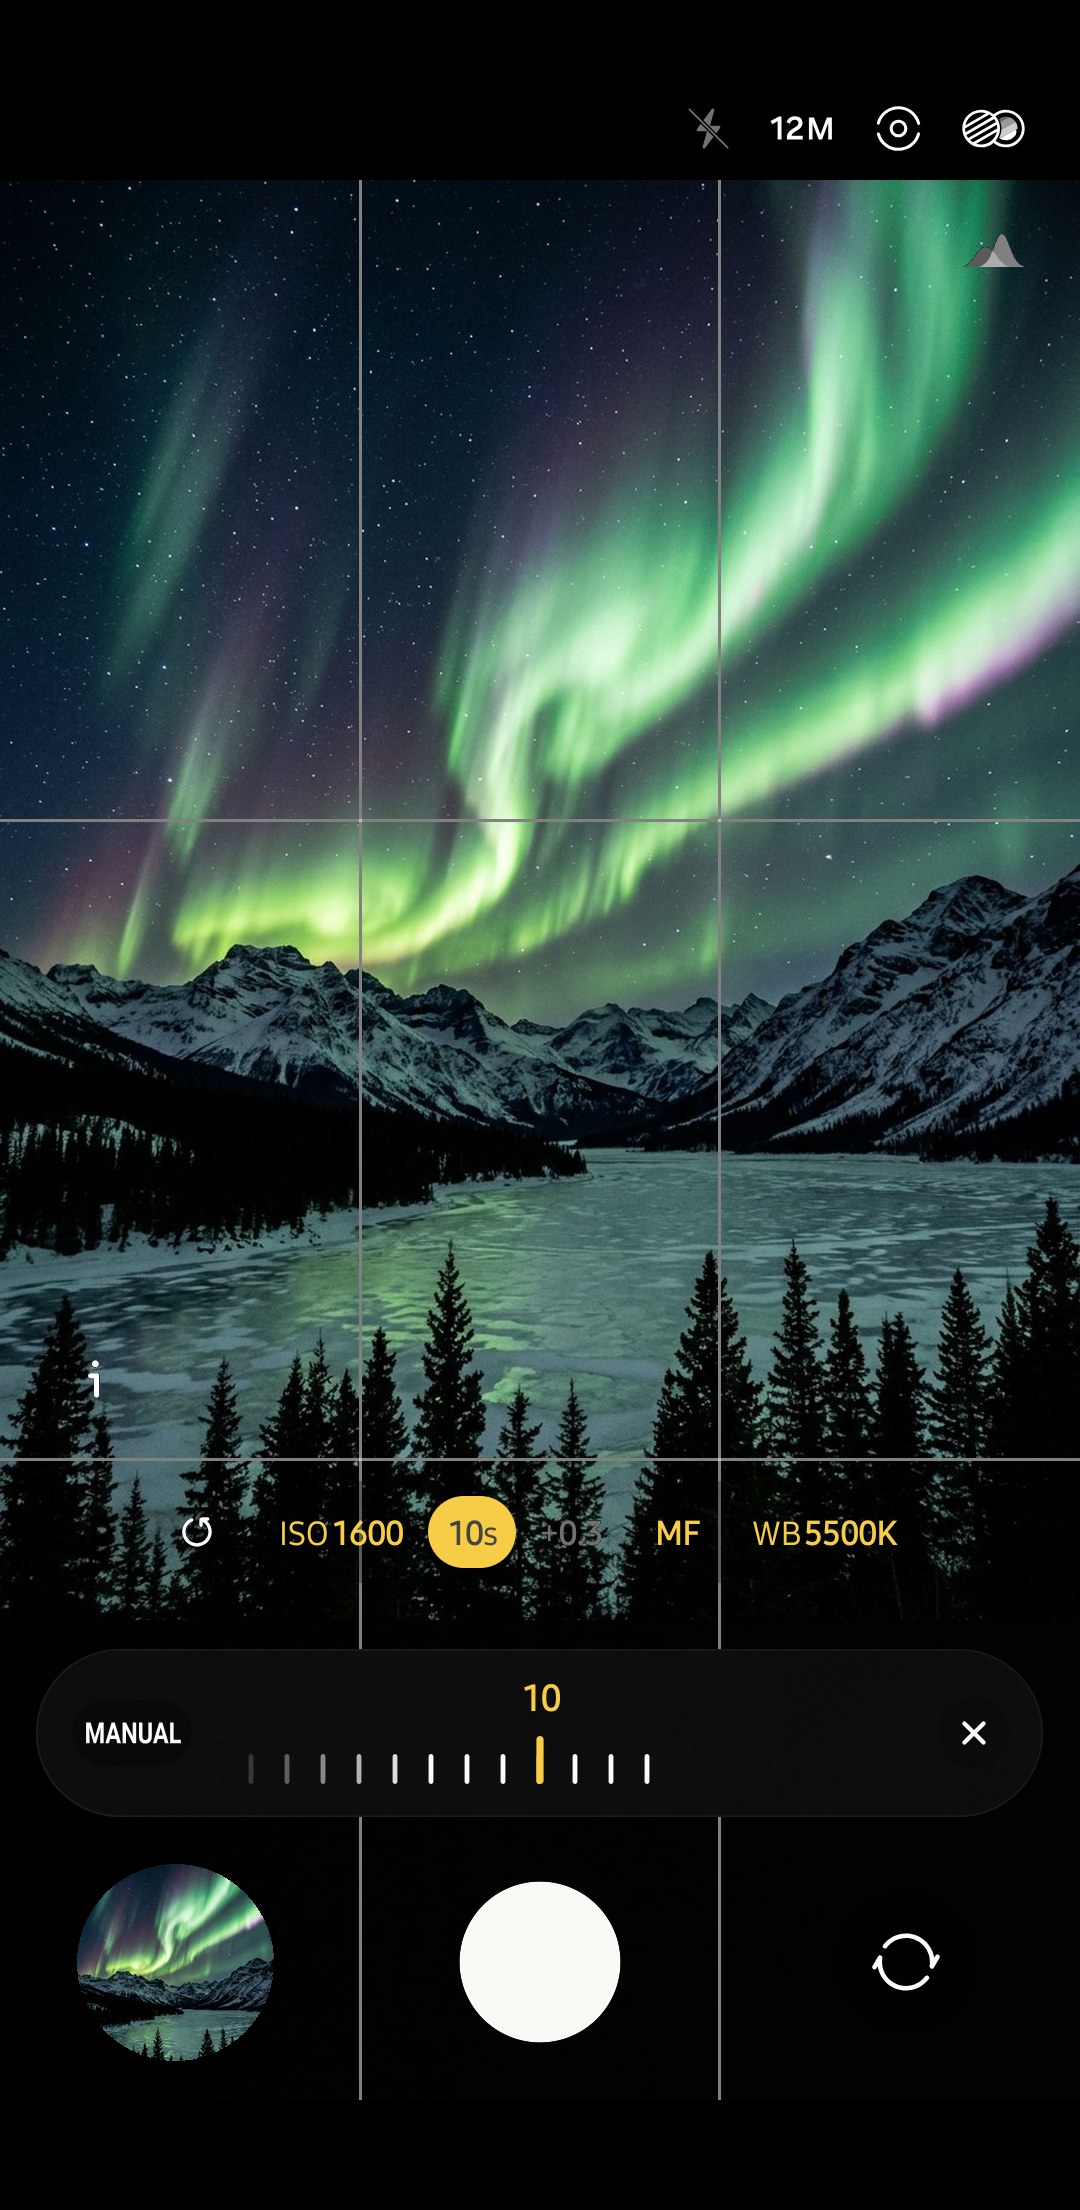
Start with a slow shutter speed (10 seconds) and high ISO (1600). For active/bright displays, go straight to shorter shutter speeds (2-5 seconds) and ISO 800 to 1600. The longer exposures will smooth out the aurora into a greenish band and shorter exposures will retain more detail in the rays and curtains.
- 4
Fix the white balance
Select a value around 3800K rather than Auto. The WB may change slightly from picture to picture when using Auto, as the brightness of the scene changes. This can make it difficult to match pictures later when processing.
- 5
Use the timer and check the frame
Set a 2-second timer to avoid shaking the phone when taking the shot. Keep the white balance setting the same while experimenting with the other settings one at a time. Compare your results with the chart below.


Reading your test frame
| What you see | Likely cause | What to change |
|---|---|---|
| The sky is almost black | Not enough exposure | Lengthen the shutter to 15 or 20 seconds, then raise ISO toward 3200 |
| The aurora is a smooth green band with no structure | The display moved during the exposure | Drop to 2 to 5 seconds and raise ISO to keep the brightness |
| Stars are short lines | The exposure is too long for the lens, or the phone moved | Stay under about 20 seconds on the main camera and check the tripod |
| Everything is soft, horizon included | Focus missed infinity | Redo the focus step and check a test shot in Gallery |
| The brightest green looks white and flat | Highlights are clipped | Shorten the shutter first, then lower ISO |
| Heavy grain and coloured speckles | ISO is too high for the sensor | Drop one ISO step and add shutter time if the aurora is slow |
The main cameras tend to have 35mm-equivalent focal lengths of around 23 to 26mm, which would give you an exposure time of around 20 seconds (using the old 500 rule by dividing 500 by the focal length) before stars start to trail noticeably. Ultra-wide lenses can go even longer. If there’s another reason for your blurry shots, the blurry photos guide covers them all.
Night mode, Pro mode or Expert RAW
While processing will take some time, Night mode is convenient since it requires no setup and can be fired off quickly. You can’t choose the focus, ISO or white balance yourself, and night skies can sometimes be processed to resemble daylight. The best advice is to just hold still until processing is complete, according to Samsung’s own low-light photography tips. The Night mode guide covers how it decides.
Expert RAW is a free Samsung application available on the Galaxy Store. Limited to the Z Fold series, some of the newer Z Flip models, and the Galaxy S line of flagships (FE and A-series phones are not included in Samsung’s list), Expert RAW shoots a 16-bit linear DNG image file for more post-processing flexibility and offers the same manual controls as Pro mode.
Aimed at shooting stars, its Astrophoto mode (accessed by choosing Special photo options with the resolution set to 12MP) stacks multiple images shot over a longer period of time. It is useful for shooting the Milky Way, but other objects, like the constantly shifting aurora, will likely end up looking mushy since the stacking process takes place over a longer period of time. For an active display, use Expert RAW's normal photo mode or Pro mode, and save Astrophoto for the star-filled nights.
| Mode | Use it for | Limits |
|---|---|---|
| Night mode | A bright display when there's no time to set anything | No manual focus, ISO or white balance |
| Pro mode | Most aurora photos, on any Galaxy that has it | Up to 30 seconds on flagships, 10 seconds on some A and M models |
| Expert RAW | The most editing room, on supported S, Fold and Flip phones | A separate app, with no FE or A-series support |
| Expert RAW Astrophoto | Stars and the Milky Way on quiet nights | Long stacking blurs moving aurora, and it only shoots at 12MP |
When and where the aurora shows up
Storms tend to be stronger around the autumn and spring equinoxes, and auroras can be seen more widely away from the poles during periods of increased geomagnetic activity. NOAA’s Space Weather Prediction Center says the best time to see auroras is typically an hour or two either side of midnight, so between 10pm and 2am local time. You have a better chance of seeing them away from city lights and when there isn’t a full moon brightening the sky, obscuring fainter shows.
NOAA’s guide to viewing auroras uses the Kp index to estimate geomagnetic activity on a scale of 0 to 9. At Kp 3 to 5 auroras are visible further from the poles than usual, at Kp 6 to 7 they may be seen as far south as the northern edge of the US, and at Kp 8 to 9 they may be seen at zenith (directly overhead) in some northern US states. If you’re further north you might see a good show even with a Kp index of 3 or 4.
NOAA’s Space Weather Prediction Center issues a 30-minute aurora forecast. Cloud cover is also important, of course, so check the weather as well as the aurora forecast before setting out. In the UK you can also sign up for alerts from AuroraWatch UK, run by scientists at Lancaster University. To receive Kp alerts on your phone, check out some of the planning apps we discuss in our photography apps for Android guide.
The Sun had reached the maximum period of Solar Cycle 25 by October 2024, according to NASA and NOAA, so this winter should still offer good aurora-watching opportunities. Some of the biggest solar storms of each solar cycle tend to happen as activity wanes after the maximum, according to Space.com, and there was a G4 (severe) geomagnetic storm as recently as November 2025, for example.
When it comes to actually catching sight of an aurora, your phone camera will often do better than your eyes. That’s because at night our vision relies on rod cells, which are sensitive to dim light but don’t detect colour, whereas a camera gathers light over several seconds, revealing more detail. If you think you’re seeing an aurora, try taking a test photo, and set your phone camera to take a 10-second exposure aimed at what appears to be a grey arc in the sky towards the north (in the northern hemisphere), because it may well look green in the photo!
Framing an aurora photo

Include some sort of foreground object (a lake that can reflect the colours, a cabin etc.) in the bottom third of the frame and let the sky take up the rest. Without this you’ll just have pictures of pretty lights in the sky with no reference point for scale or location.
Use a horizontal orientation for curtains and arcs that stretch across the sky and vertical for columns of light or a corona/crown effect directly overhead.
Avoid including any lights (headlamps, car lights etc.) in your frame, as even a brief flash will be picked up during a long exposure (even 10 seconds), resulting in unsightly streaks of light ruining your photo.
Make sure your horizon line is straight! If your phone has this option, turn on the gridlines (Composition guide in Camera settings, or Grid lines on older phones) to make this step easier.
Filming the aurora
Video is more challenging than stills since each frame at 30fps only has 1/30th of a second to gather light as opposed to, say, 10 seconds in a still image. The display needs to be fast and bright enough to be captured well.
If Pro video mode on your phone allows 24fps, use it with a 1/24s shutter speed. Increase the ISO as much as you can stand the noise.
Editing aurora photos
Open the DNG in a RAW file editing app such as Snapseed (free) or Lightroom mobile (check which of its tools your plan includes). First, set white balance. Anywhere between 3500 and 4500K tends to work well depending on how blue you want the sky to be. Next, work with the highlights and shadows. You can bring down the highlights to recover some detail in the brightest parts of the green. Increase shadows until you start to be able to see some of the foreground.
Be careful with noise reduction, as too much of this will remove the detail in the wispy rays. Similarly, be careful not to over-saturate your image. The aurora is mostly green (with hints of red/purple on the edges on particularly active nights) and too much saturation will make a real-life image look fake. The Lightroom vs Snapseed comparison can help you pick an editor.
What are the best Samsung camera settings for the northern lights?+
Can Night mode photograph the northern lights?+
Why does the aurora look brighter on my phone than in the sky?+
Can a Galaxy A phone photograph the northern lights?+
Should I use Expert RAW Astrophoto for the aurora?+
What Kp index do I need to see the northern lights?+
Keep reading

How to Photograph Christmas Lights on a Samsung Galaxy
Samsung settings for Christmas lights: tree lights indoors, bokeh with Portrait mode and telephoto, blue-hour street displays, light trails and snow.

Samsung Selfie Camera Settings
Samsung selfie camera settings: stop selfies saving flipped, pick wide or normal framing, turn off beauty effects, use Show palm, and fix blurry selfies.

Galaxy A17 Camera Settings for Better Photos
The best Galaxy A17 camera settings for daylight, low light, people and video, plus the limits to plan around: 1080p video, no RAW and a 2MP macro.

Samsung Concert Video Settings: Light, Sound and Flicker
Concert video on a Galaxy: settings for a bright stage in a dark room, loud sound and Zoom-in mic, LED-wall flicker, battery, storage and venue manners.