Samsung Astrophotography: Shoot the Milky Way on Galaxy
Samsung astrophotography: which Galaxy phones have Expert RAW Astrophoto, Pro mode settings for the Milky Way, when and where to shoot, and how to edit.
Samsung’s recent Galaxy flagships support up to 30-second exposures in Pro mode, while Expert RAW’s Astrophoto mode (when available) stitches together images taken over a few minutes. Either way, a Galaxy propped up on a tripod can snap photos of the Milky Way on a dark night.

Which Galaxy phones can shoot the Milky Way
Expert RAW is available on Galaxy S series phones (from the Galaxy S20 to the Galaxy S26), Galaxy Z Fold and Flip phones, and some Galaxy A series phones (Samsung’s support page just says “Galaxy A series (models with advanced camera systems)”, with no specific models listed). According to SamMobile, though, the app won’t install on the Galaxy S25 FE.
The Astrophoto mode within Expert RAW is available on Galaxy S22 series phones with T OS (Samsung’s way of referring to Android 13; on Galaxy phones, Android 13 came as One UI 5) and Galaxy S23 series phones, according to Samsung, and on more recently added Galaxy phones such as the Galaxy Z Fold4 (according to Android Authority, the feature first became available in beta form in October 2022 on Galaxy S22 series phones that had been updated to One UI 5, and according to GSMArena, it made its way to the Galaxy Z Fold4 in an Expert RAW update in May 2023). If you don’t see a Special photo options section in Expert RAW’s settings menu, your phone doesn’t support Astrophoto mode.
Pro mode with a manual shutter speed is your best bet for shooting the Milky Way if your Galaxy phone doesn’t support Astrophoto mode in Expert RAW. You can use it on any Galaxy with a manual shutter.
| Method | Phones | How it works | Limits |
|---|---|---|---|
| Expert RAW Astrophoto | Galaxy S22 series on One UI 5 (T OS) or later, S23 series, and other models added by Expert RAW updates | Combines frames over a shooting duration you choose, with an optional Sky Guide overlay | Only at 12MP and needs a tripod. Won't install on the S25 FE, and Samsung names no A-series model |
| Pro mode | Most Galaxy phones with a shutter control | Single exposures up to 30 seconds on recent flagships | Some A and M phones stop at 10 seconds or have no shutter control |
| Night mode | Most recent Galaxy phones | Blends several frames automatically, handheld | No manual focus, ISO or white balance (see the Night mode guide) |
The Galaxy S26 series
Astrophoto was tested on the S26 Ultra by Tom's Guide in April 2026. They captured images ranging from 30 seconds to 12 minutes long, contingent on conditions.
We couldn’t find confirmation that Astrophoto is on the S26 or S26+, but you can look for Special photo options in Expert RAW’s settings menu to confirm. Expert RAW is confirmed available on all three S26 phones according to Samsung’s Levant support website (updated in October 2026).
Hyperlapse with Star trails (as described below) is listed for all three S26 phones in Samsung’s user guide for the S26.
| Phone | Expert RAW | Astrophoto | Hyperlapse with Star trails |
|---|---|---|---|
| Galaxy S26 Ultra | Yes | Yes, confirmed by Tom's Guide | Yes, in Samsung's S26 guide |
| Galaxy S26 and S26+ | Yes | Not confirmed, so check Special photo options | Yes, in Samsung's S26 guide |
| Galaxy S26 FE | Unclear. Samsung lists the S26 series without saying whether the FE counts, and SamMobile found the app won't install on the S25 FE | Not confirmed | Not confirmed |
When and where should I photograph the Milky Way?
The best time to see the Milky Way core is around new moon (NASA notes that the moon is out during the day instead of lighting up the night sky) and in a dark location (the core is visible from a Bortle class 4 sky, on a scale developed by astronomer John Bortle and published in Sky & Telescope in 2001, but won’t have much visible structure; from Bortle class 5 skies, typical of many suburban areas, the core will appear quite washed out, especially towards the horizon). To check how light polluted your area is, check out lightpollutionmap.info. From the Northern Hemisphere, the Milky Way core can be seen roughly from February through October, according to AstroBackyard’s calendar, with May through August offering the best opportunities. It’s located relatively low in the southern sky, in the general direction of the constellations Sagittarius and Scorpius, according to Live Science. The farther south you go, the more of the Milky Way you’ll be able to see, and from the Southern Hemisphere the core will appear much higher in the sky. Clear Outside offers hour-by-hour cloud predictions. See our photography apps for Android guide for a comparison with PhotoPills.

| What to pack | Why it matters |
|---|---|
| A full-size tripod and phone clamp | Exposures last from 15 seconds to several minutes, and a flexible mini tripod can sway (see the tripod guide) |
| Expert RAW, if your phone supports it | It's free in the Galaxy Store and adds the Astrophoto mode |
| A power bank | Long exposures and a bright screen drain the battery, and cold nights make it worse |
| A microfibre cloth | Dew can form on cold glass during a session and soften every star |
| A head torch | You'll need light to set up, but switch it off before each exposure |
How do I use Astrophoto mode in Samsung Expert RAW?
Astrophoto mode, found within Expert RAW, is Samsung’s take on stacking together multiple photos to create a detailed shot of the night sky.
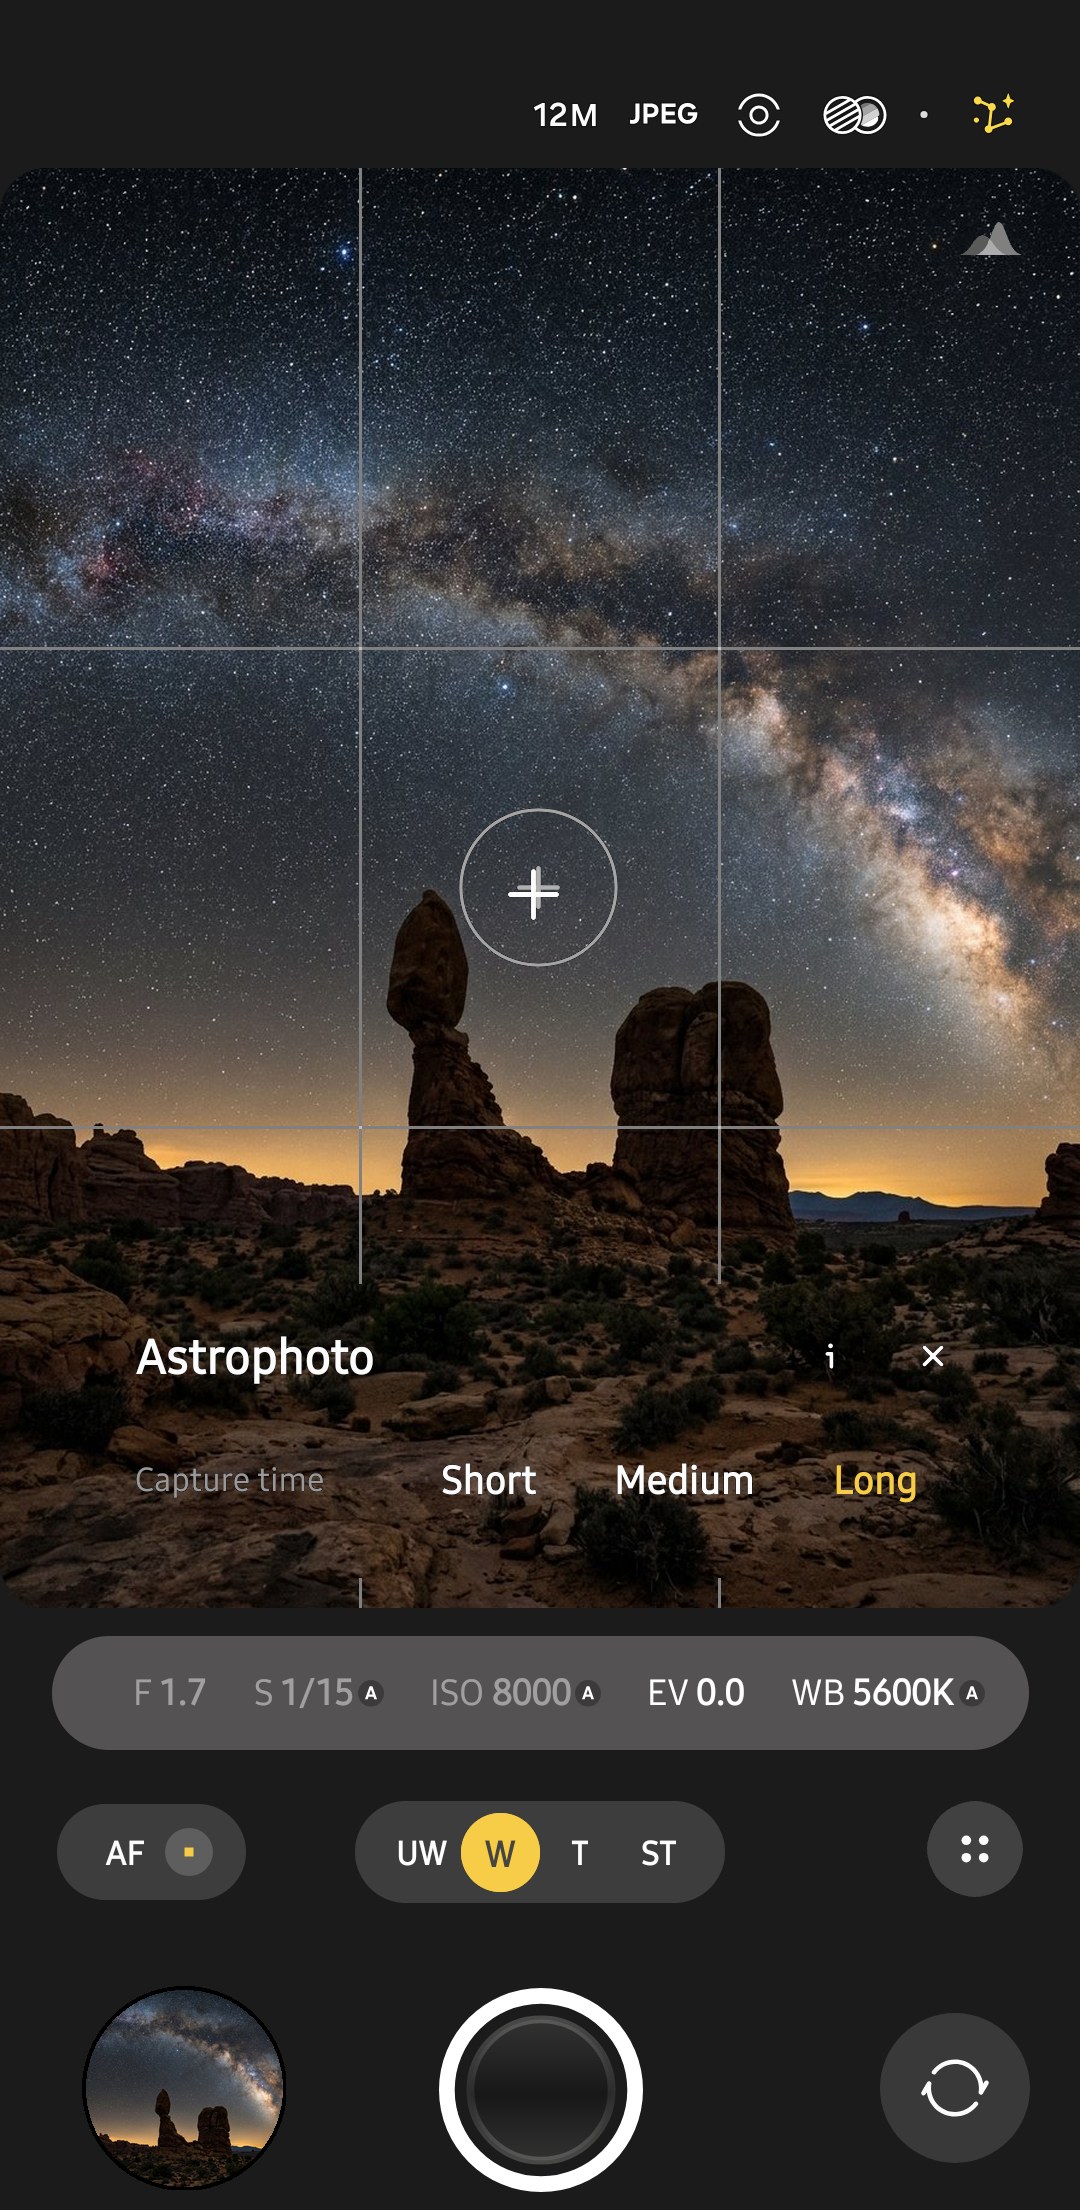
As per Samsung’s support page, to use Astrophoto, you’ll first need to download Expert RAW from the Galaxy Store and set it to 12MP (Special photo options can only be enabled in Settings if Expert RAW is set to 12MP). You can then enable Special photo options, tap the astrophotography mode icon, select whether you want the Sky Guide to overlay constellations on the preview screen, and then choose how long you want your shot to capture for.
On Expert RAW 6.0.02.8 (which we checked on a Galaxy S25 Ultra running One UI 9 in November 2026), Capture time offers three options, which are Short, Medium and Long, but doesn’t specify exactly how long each is. When Astrophoto was new, MobileSyrup noted that on the Galaxy S23 Ultra, exposures could last up to 10 minutes.
As you can imagine, if you’re taking photos using Astrophoto, you’ll want to make sure your Galaxy phone is as steady as possible, mounted on a sturdy tripod, for the duration of the shot. Resist the urge to fiddle with it!
As with Expert RAW shots in general, images taken using Astrophoto are saved as both JPEGs and 16-bit linear DNGs, the latter of which offer greater scope for post-processing.
Astrophoto is best suited to photographing still objects in the night sky, as anything that moves (think: aurora) during the exposure will end up looking like a streak or smear.
- 1
Set up Expert RAW
Download Expert RAW from the Galaxy Store and make sure the resolution is set to 12MP (in Expert RAW 6.0.02.8 it’s in the top bar, and a Galaxy S25 Ultra with One UI 9 showed 24M there in November 2026). Go into the settings of Expert RAW and enable Special photo options.
- 2
Choose Astrophoto
Enable astrophotography mode by tapping the astrophotography mode icon on the shooting screen. Sky Guide will draw lines between stars to show constellations. Enable or disable it as desired.
- 3
Set focus and capture time
Set your focus to infinity. If the sky appears to be orange in colour you may need to adjust your white balance. Select a time to suit the light, as Samsung’s support page advises; try Long for darker skies and Short for areas with more light.
- 4
Shoot without touching the phone
Avoid bumping the camera during long exposures. Tap the shutter button, then leave it alone until the exposure is complete. Bumps during long exposures can cause stars to appear softer than they should.

Pro mode settings for the Milky Way
Open the Camera app and select Pro mode (it works on Galaxy phones without Astrophoto). This will also let you see what each of the settings does as you change them.
Use the 1x camera (the main one, as opposed to the ultrawide or telephoto) for the biggest sensor and brightest lens.
Set the shutter speed to 15 seconds (recent flagships allow 30 seconds, but you will get star trailing on the main camera at 30 sec, since the “500 rule” of 500 divided by the focal length (23 or 24mm equiv on the main camera) gives around 20 sec max).
ISO – start with 3200 but if the sky appears greyish when you review your photos, you can drop it to 1600.
White balance – 4000K will give a nice blue-black sky (higher/warmer settings will bring out brownish tones from light pollution if you’re shooting from anywhere near a town).
Switch to MF (manual focus). Drag the focus slider all the way to one end (infinity), then move it slightly the other way whilst looking at a nice bright star and stop when it’s as pinpoint sharp as it gets.
Set the timer to 10 sec so you don’t blur the image by hitting the shutter button, then take around 10 identical exposures and choose the best of them afterwards.
Set Pro mode to save RAW files too – Camera settings, Photo format, Pro mode picture format (on One UI 9).
| Setting | Starting value | Why |
|---|---|---|
| Lens | 1x main camera | Biggest sensor and brightest lens on the phone |
| Shutter | 15 seconds (10 on windy nights) | Under the 500-rule limit of about 20 seconds for a 24mm lens |
| ISO | 3200, or 1600 if the sky looks grey | Bright enough for faint stars without too much noise |
| White balance | 4000K (3800K under orange skyglow) | Keeps the sky blue-black |
| Focus | Manual, at infinity, checked on a bright star | Autofocus hunts in the dark |
| Timer | 10 seconds | Keeps your finger off the phone during the exposure |
| Format | RAW and JPEG (Pro mode picture format) | A DNG gives more room to fix noise and colour (RAW vs JPEG) |

Star hyperlapse and star trails
In a still photo, the sky looks frozen. But using the Camera app’s Hyperlapse mode at its 300x night speed will show you the sky moving! On the Galaxy S26, there’s also a Star trails option that literally shows you stars making trails in the sky!
For best results, follow these tips from Samsung’s Galaxy S23 page (the series that first included Star trails):
- Open the Camera app and switch to Hyperlapse.
- Choose UHD for video quality.
- Set the speed to 300x.
- Tap Star trails.
- Use a tripod to keep your Galaxy steady, point it at the night sky, and start recording.
Samsung recommends leaving it to record for an hour, which would make a 12-second video!
- 1
Open Hyperlapse
In Samsung’s guide for the S26, it’s in the Camera app under More. On One UI 9, on the Galaxy S25 Ultra it’s in the strip of modes.
- 2
Set UHD
Select resolution and choose UHD to give yourself room to crop later if required.
- 3
Choose 300x and Star trails
Tap the speed icon and choose 300x (night). Tap the Star trails icon. Star trails can be turned off to get a regular time-lapse of moving stars.
- 4
Record for at least an hour
Add something in the foreground to give it scale. Start recording and put the phone down! An hour will net you about 12 seconds’ worth of video using the 300x speed.
If you forget the Star trails icon, Samsung’s Edit suggestions page also shows a Star trails effect that Gallery may offer for astro videos afterwards. According to a 2023 report by SamMobile, Samsung didn’t bring this to the S22 and Z Fold4, so it’s worth seeing if you have 300x in your Hyperlapse mode. The hyperlapse guide covers the other speeds and time limits.
Why do my Galaxy star photos look streaky, orange or soft?
| What you see | Likely cause | What to change |
|---|---|---|
| Stars are short streaks | The tripod moved or the exposure ran too long | Hang your bag from the tripod for weight and cut the shutter to 10 seconds on windy nights |
| The sky is orange or brown | Light pollution plus a warm white balance | Drop white balance to 3800K and move further from towns, because no setting replaces a darker sky |
| Every star is a soft blob | Autofocus settled on nothing in the dark | Set manual focus on the brightest star before you frame the shot |
| The image gets hazier through the night | Dew forming on the cold lens | Wipe it with a microfibre cloth and keep the phone in an inside pocket between sessions |
How do I edit Milky Way photos from a Galaxy phone?
Always edit from the RAW file – it’ll have more shadow detail and colour information to work with than the JPEG. Cool the white balance to get rid of any brownish sky colours (aim for blue-black). Straighten out any horizons before making other edits. If you shot in Pro mode and captured multiple images, pick the sharpest and copy any edits you make onto the other shots. In Lightroom mobile try Shadows +40, Highlights -20, Clarity +20 and Dehaze +15, as these will help bring out the Milky Way from the sky glow without crushing the stars. Use noise reduction sparingly, because too much will obliterate faint stars. Consider keeping the foreground darker than the sky to encourage people’s eyes to focus on the sky. Snapseed works well too. Use the Lightroom vs Snapseed comparison to select an editor.
Frequently asked questions
Which Samsung phones have an Astro mode?+
How long does a Samsung astro exposure take?+
Can I shoot the Milky Way from a city?+
What are the best Pro mode settings for the Milky Way on a Galaxy?+
Should I use Astrophoto mode for the northern lights?+
Keep reading

How to Shoot Cinematic Video on a Samsung Galaxy
Cinematic video on a Galaxy: Pro Video at 24 or 25fps with a 1/50s shutter, ND filters, Log or HDR, lens choice, focus pulls, sound and a simple grade.

Samsung Log Video: How to Shoot, Expose and Grade It
How to record Samsung Log on Galaxy S24, S25, S26 and recent foldables, expose it with zebras and LUT preview, use APV on the S26 Ultra, and grade it.

Symmetry Photography on a Samsung Galaxy: Find and Shoot It
Shooting symmetry on a Samsung Galaxy: finding the centre line, the Composition guide level, which lens to use, reflections and straightening in Gallery.

Samsung Shutter Speed: Freeze Action, Shoot Light Trails
Samsung Pro mode shutter speeds: what freezes action, the handheld minimum for each Galaxy lens, and 1 to 30 second exposures for water and light trails.