Samsung Photo Assist: How to Use AI Eraser, Move and Create
How to use Galaxy AI Photo Assist on One UI 9 and 8.5: AI eraser, Move, Create and Style, tested on a Galaxy S25 Ultra, plus the AI label and 12MP limit.
Photo Assist is Samsung’s built-in AI photo editor, available in the Gallery app on phones and tablets running One UI 8.5 or later. It features an AI eraser (for removing objects or people), Move (to straighten photos or move objects around), Create (to add or change things with a prompt, another photo or a sketch), and Style (to change the style of photos and portraits). We’ve tried out all of the steps outlined below using three different photos of our own. All screenshots are from a Galaxy S25 Ultra with One UI 9 installed, as of November 2026.
If you only want to remove something small without an internet connection or an AI label, the classic Object Eraser can be the better tool, and our Object Eraser guide covers it. To learn more about each Galaxy AI feature for photo and video in one place, visit our Galaxy AI hub.

Which Galaxy phones have Photo Assist?
| Phones | What you get |
|---|---|
| Galaxy S26, S25 and S24 series, S24 FE, S25 FE, S26 FE, S25 Edge, Z Fold6 to Fold8, Z Flip6 to Flip8, TriFold, Tab S10 and S11 | The full Photo Assist with AI eraser, Move, Create and Style (One UI 8.5 or later) |
| Galaxy S23 series, Z Fold5 and Flip5 | An older Photo Assist with continuous editing; one owner reported no text prompts or Style tab |
| Galaxy S22 series, Z Fold4 and Flip4 | Generative Edit, Sketch to image and Portrait Studio (these phones stopped at One UI 8) |
| Galaxy A series (A57, A56, A37, A36 and others) | No Photo Assist. Object Eraser and Edit suggestions instead |
How to open Photo Assist
- 1
Open the photo in Gallery
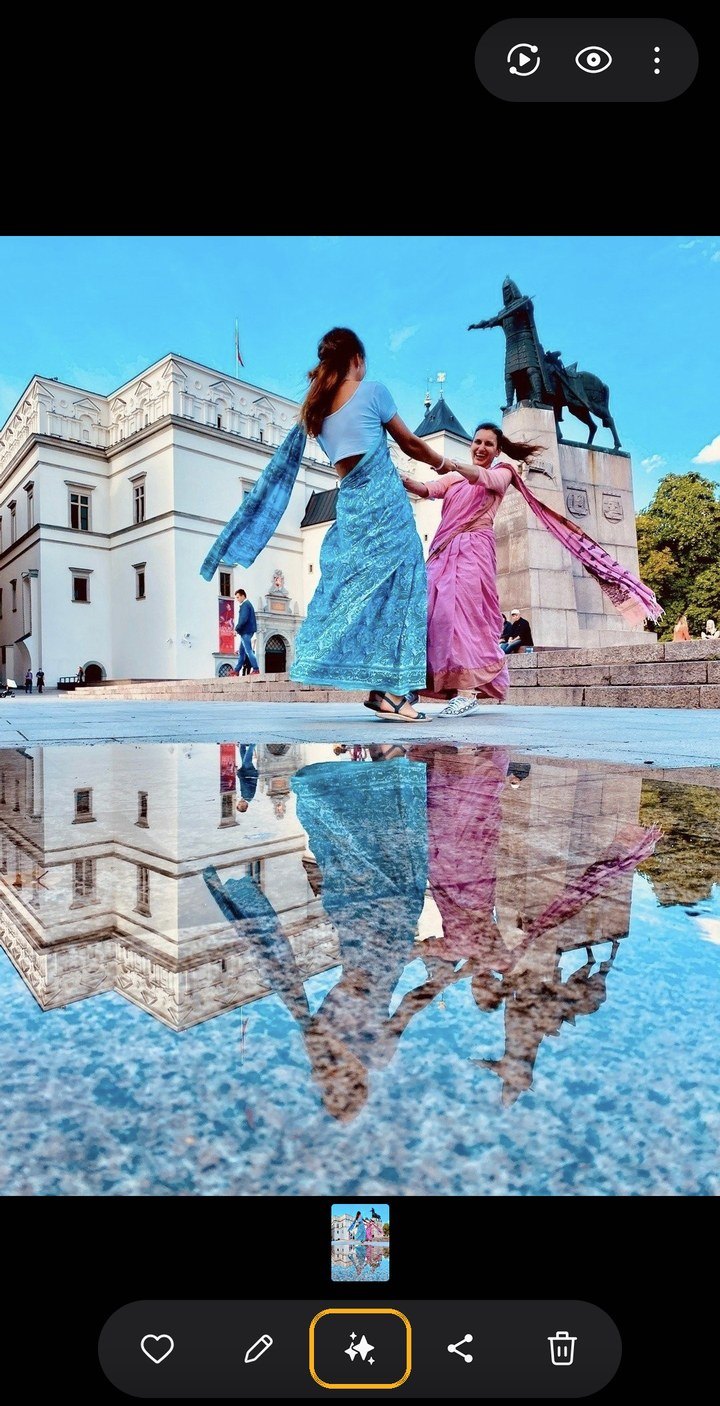
In the Gallery app, open a photo and tap the Photo assist button (the sparkle icon) in the middle of the toolbar at the bottom of the screen, next to the Edit pencil.
- 2
Pick a tool
You'll see AI eraser selected by default, but you can also tap Move, Create and Style along the bottom of the screen.
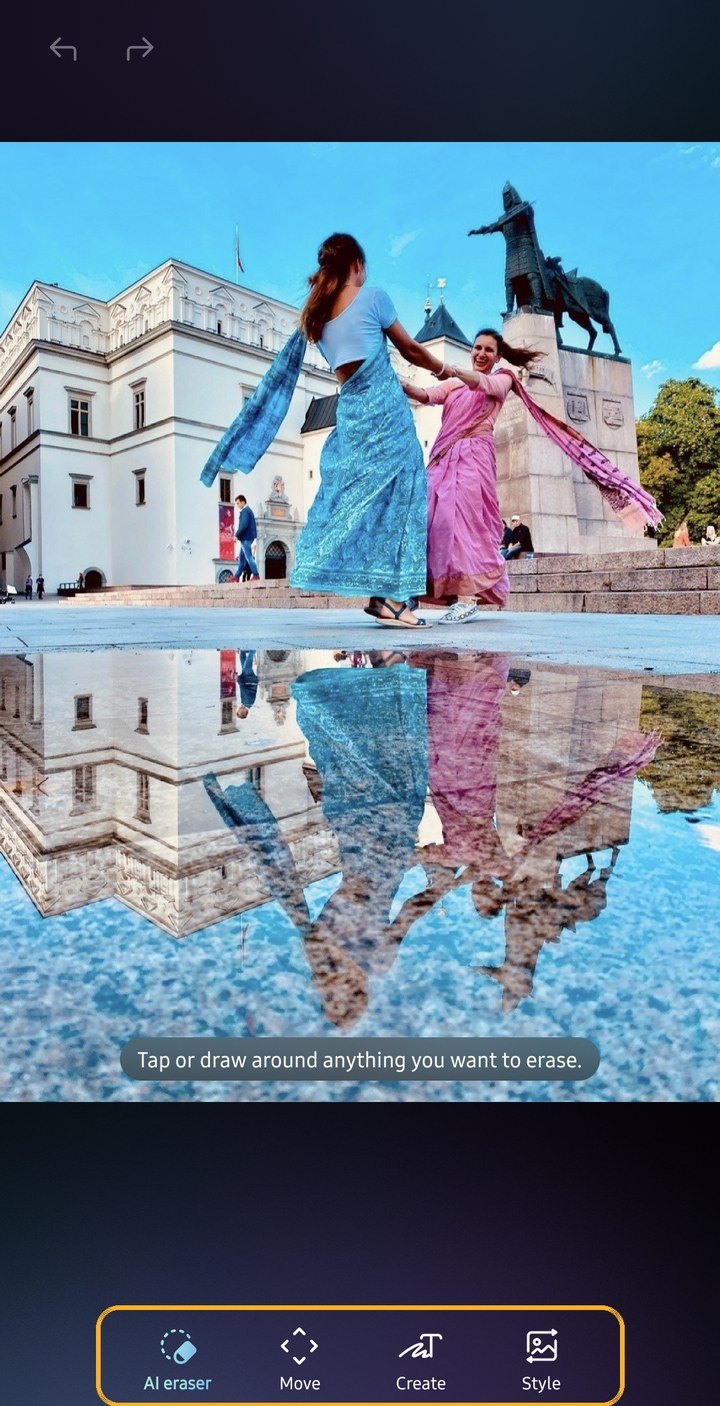


On One UI 8.5, tap Edit (the pencil icon), then the Photo Assist icon. If you can't see it, make sure you're signed in to your Samsung account and that Photo assist is turned on in Settings › Galaxy AI › Photo assist.
How to remove people and objects with AI eraser
- 1
Let it suggest, or choose yourself
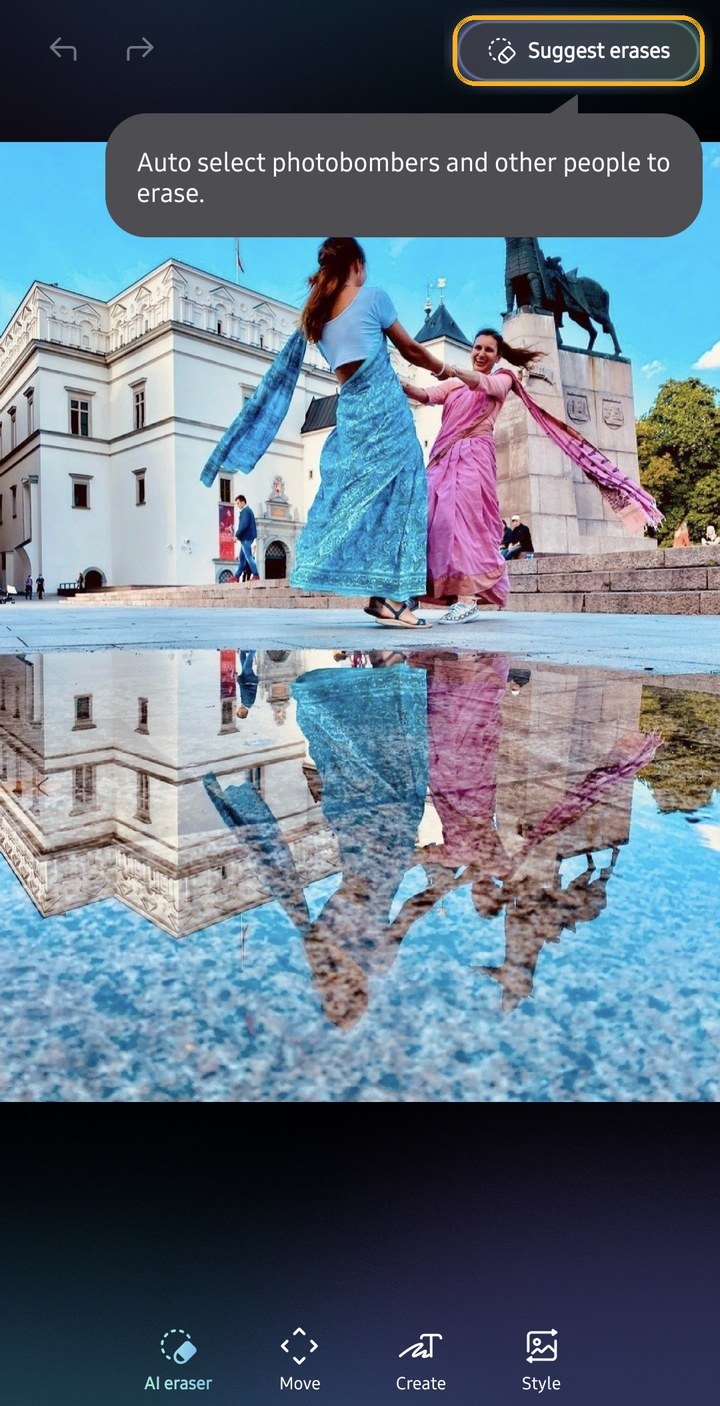
Tap Suggest erases in the top right corner and Photo Assist highlights photobombers and other people for you. Or tap the person or object you want to erase, or draw a loop around it.
- 2
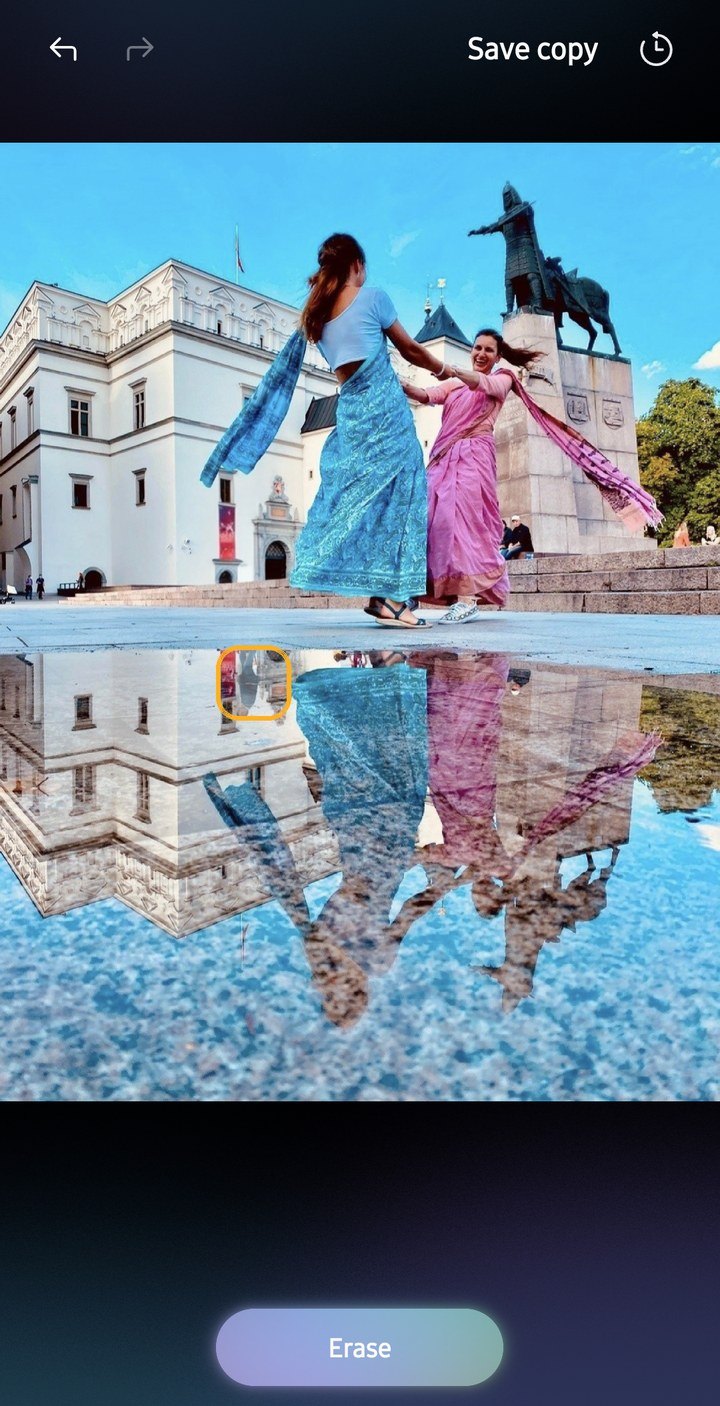
Tap Erase
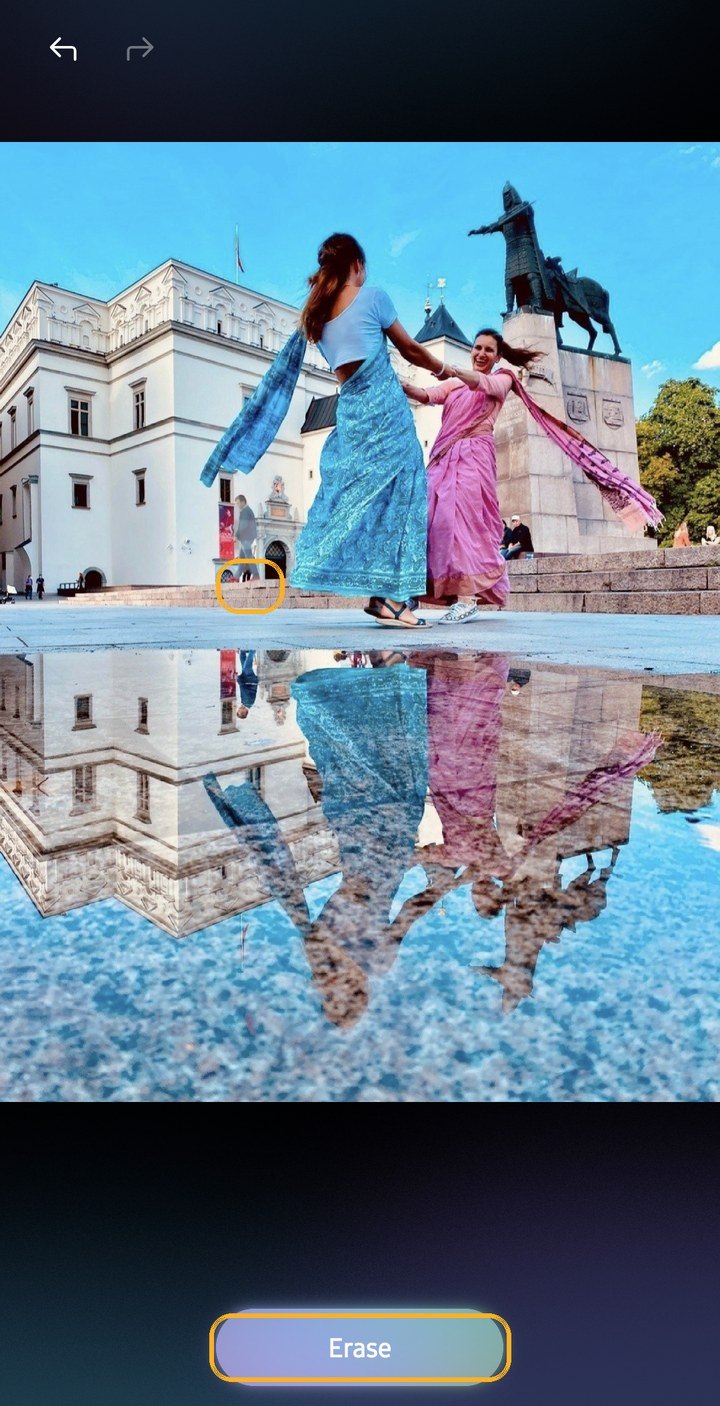
The item will be highlighted in grey. Tap Erase and wait a few seconds while Photo Assist fills the gap.
- 3
Check for reflections and shadows
In our example photo taken in Vilnius’s Cathedral Square we removed a passer-by, but the passer-by's reflection in a puddle was still there. To remove it, tap Keep editing, select the reflection the same way and tap Erase.
- 4
Save a copy
Once you're happy, tap Save copy to save the edited photo, or Keep editing to carry on with another tool. Show previous flips back to the original so you can compare.
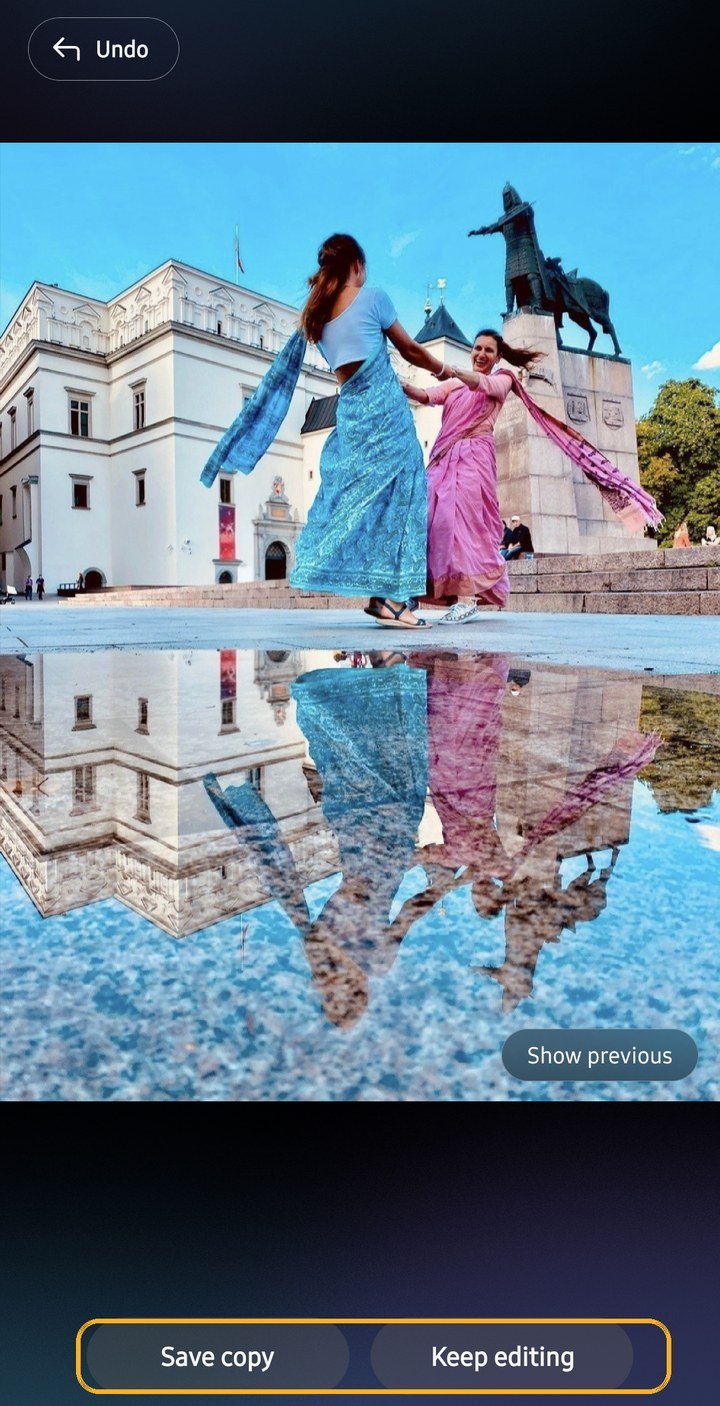


Photo Assist does a good job of erasing without smearing the photo. At normal viewing size it convincingly rebuilt the poster and doorway behind the passer-by. Be accurate when you tap small things, though: our first tap barely changed anything, because we'd selected the steps underneath them by mistake. If you're erasing something small, zoom in with two fingers first.
How to move, resize and straighten with Move
- 1
Straighten first if you need to
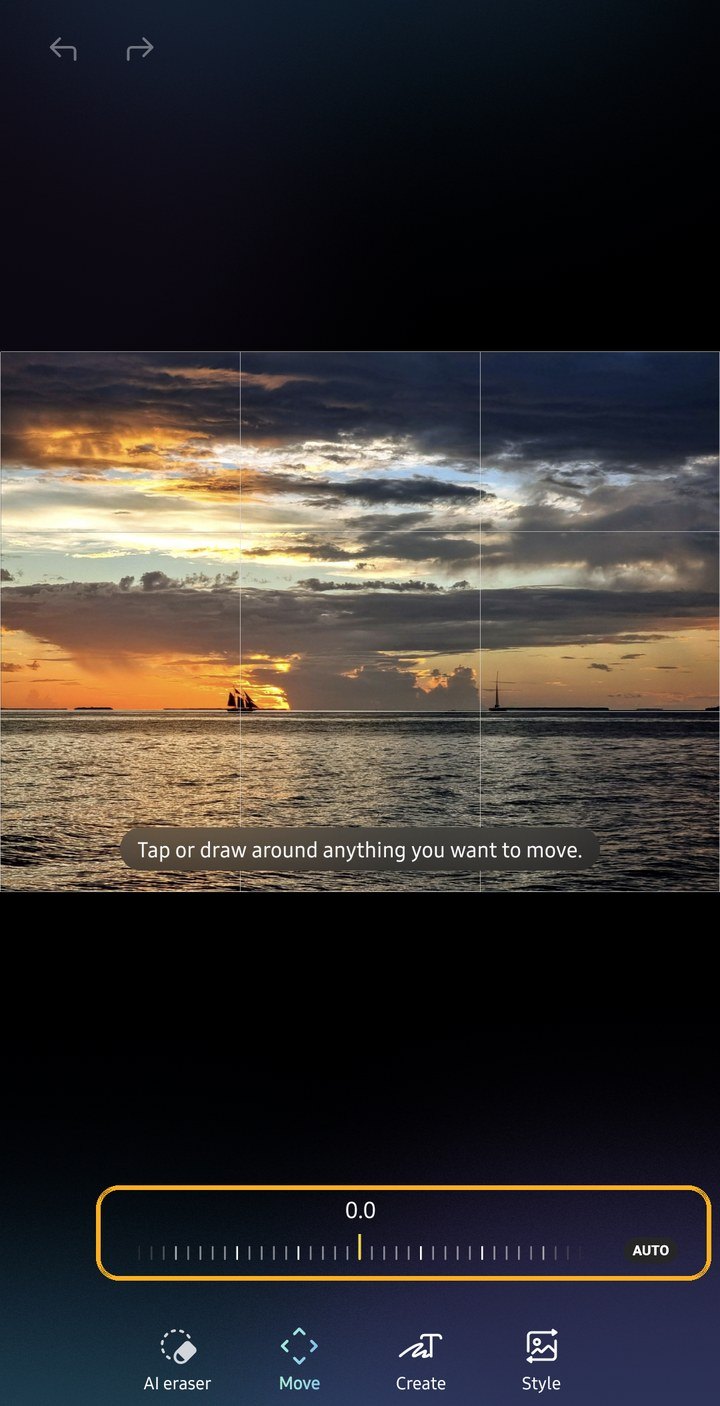
Tap Move. You can rotate the image using the dial below the image, or level it with Auto. Corners of the image will be recreated instead of cropped out if you use Photo Assist.
- 2
Select, then drag
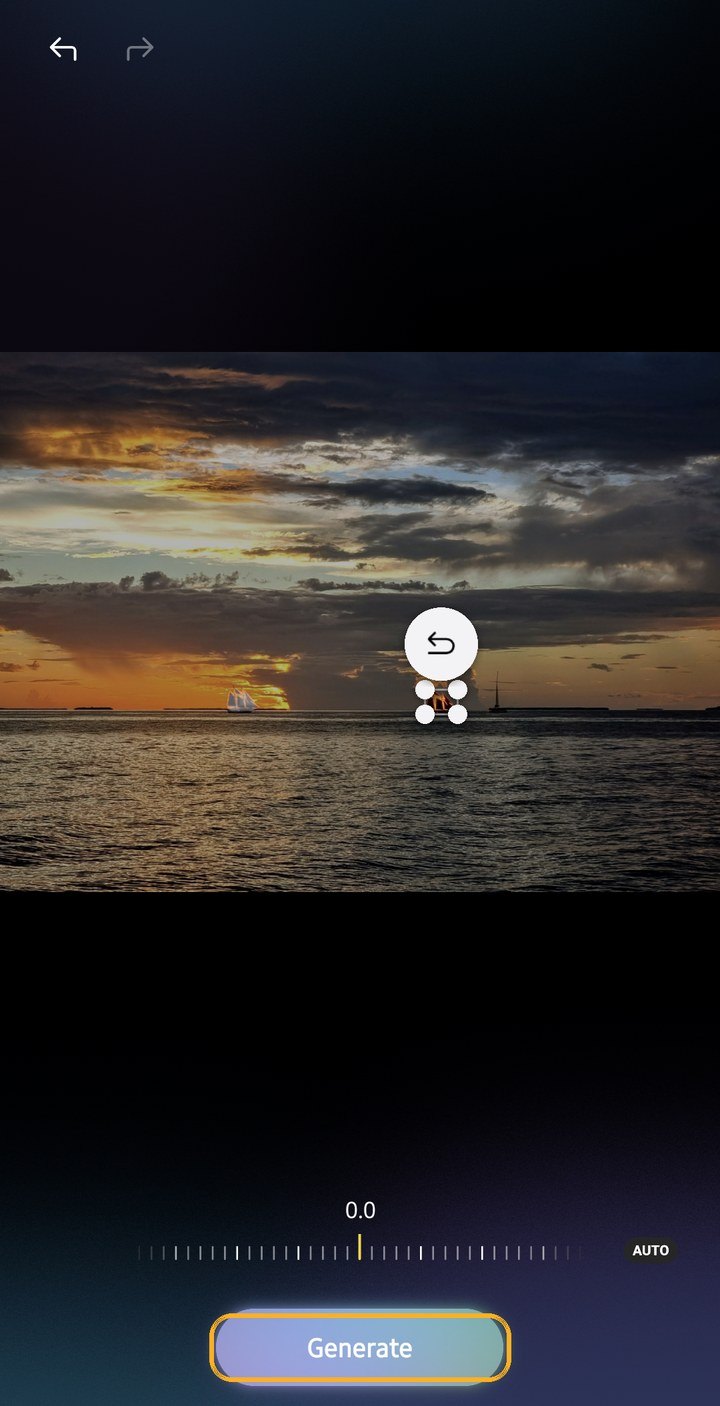
Tap a subject in the image and Photo Assist will select it for you. Move the subject by touching and holding it, then dragging it to a new location. You can also resize the subject by pinching. Undo your last move using the button that follows your selection.
- 3
Tap Generate
Photo Assist will recreate the image to fill in where the subject used to be, and blend the subject into its new location. You can save a copy of the image or continue editing.


The moved ship came back with orange-lit sails. Photo Assist relit it to match its new spot, which looks natural but is a step away from what we shot.
How to add things with Create
- 1
Choose how to describe it
Tap Create. Type what you want into Describe what to change, tap the picture icon (Add from image) to bring in an element from another photo, or tap the paintbrush (Sketch to image) to draw it yourself.
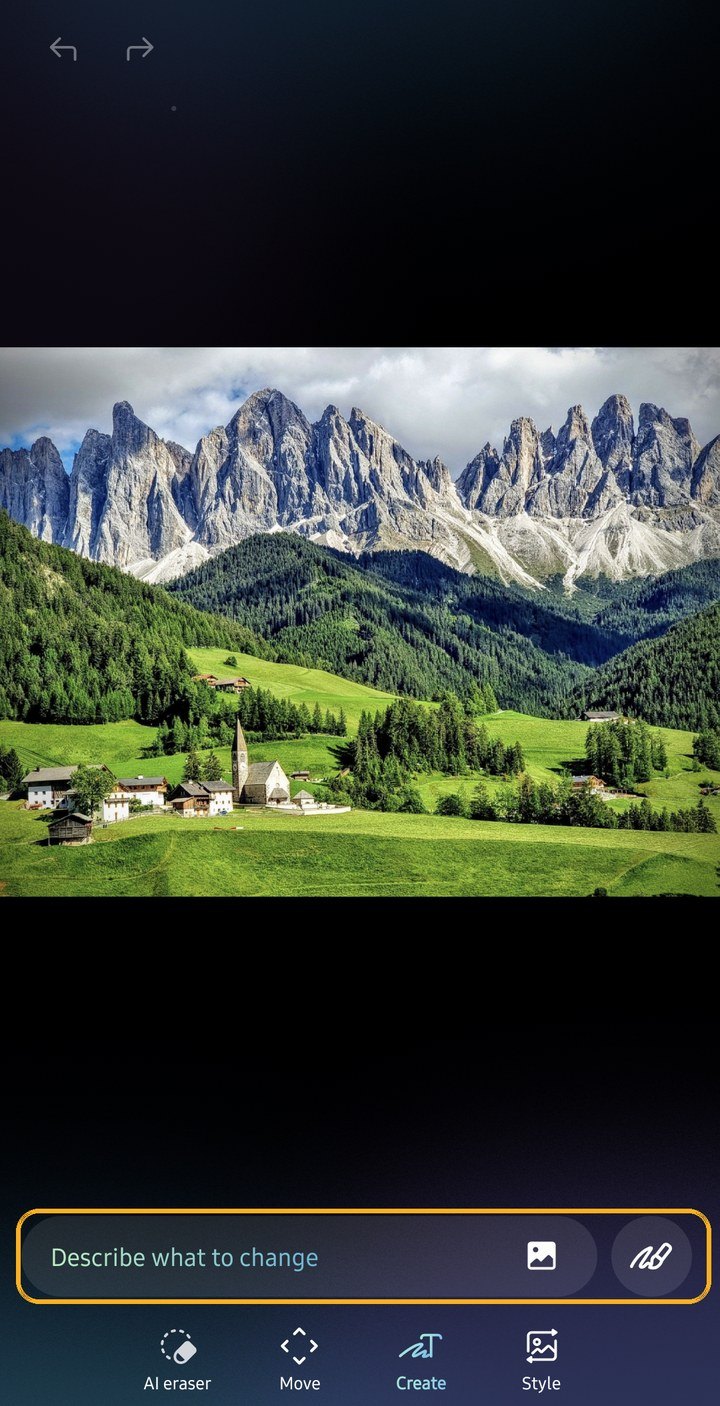
- 2
Write a short prompt
In our case we simply typed "Add a red hot air balloon in the sky" and tapped Generate. Photo Assist prompts work in 41 languages, and Samsung says One UI 9 also lets you speak your prompt.
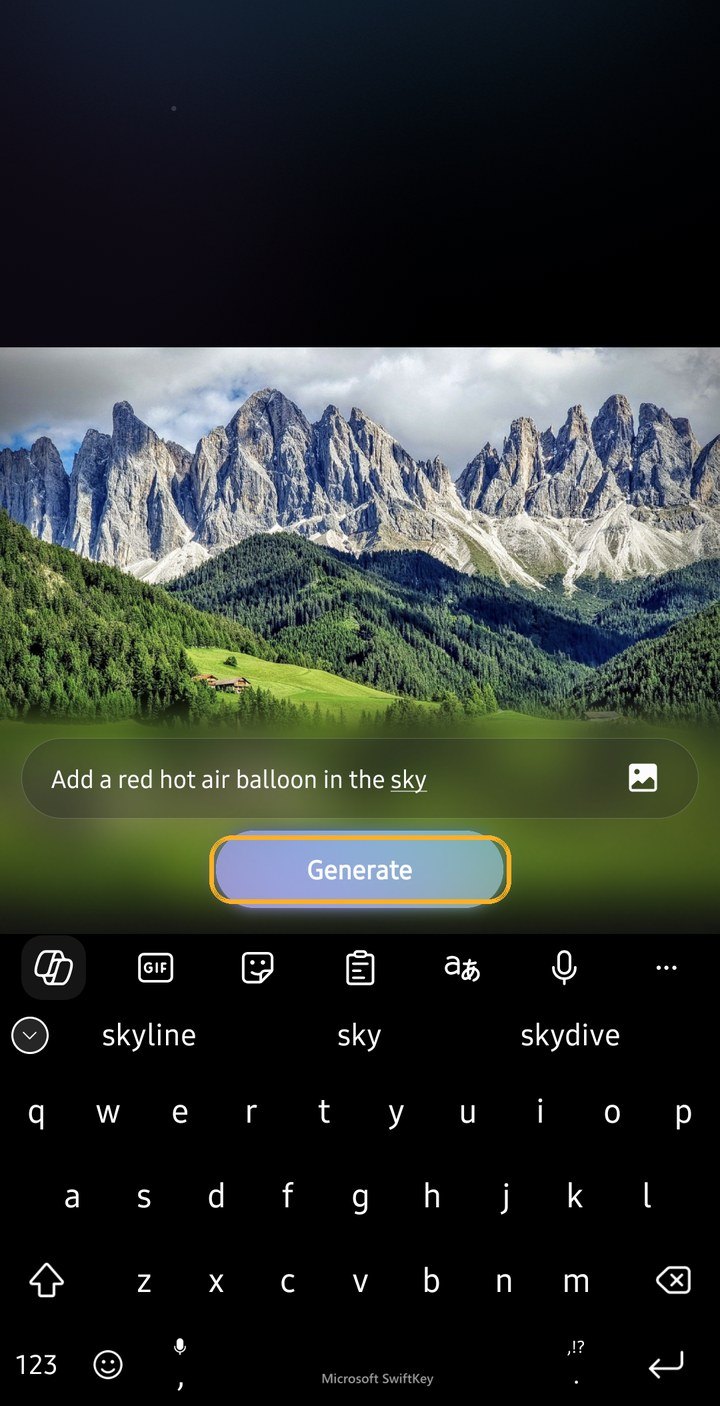
- 3
Compare, then save
Once processing is done, you will be able to see the result (with a Show previous button to compare with the original). Swipe left and tap Generate one more for another version. Then tap Save copy or Keep editing.
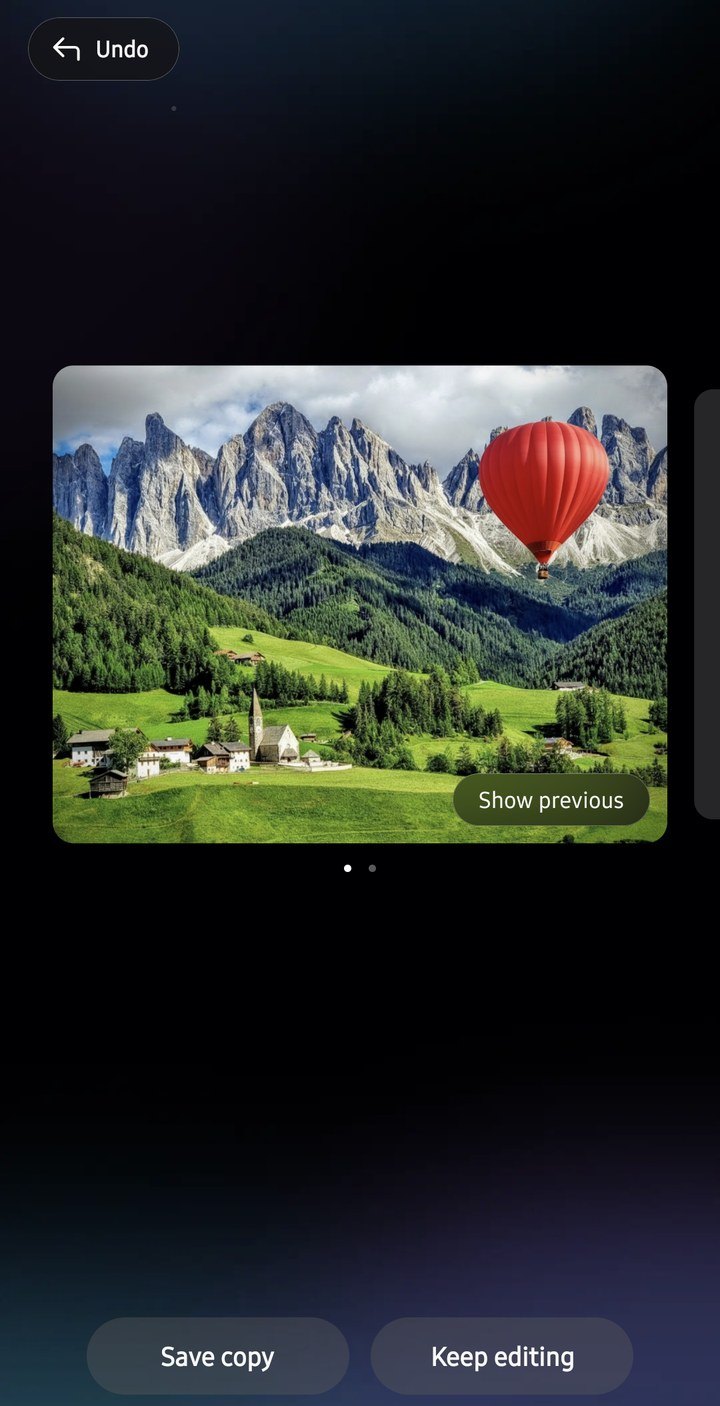


In Tom's Guide's test, Photo Assist refused prompts that named a film character and a famous landmark, so keep prompts general. You can make a selection and ask Photo Assist to add something there, however.
How to restyle a photo with Style
- 1
Tap Style and pick a look
Styles appear as a row below the image, and All shows the full list: 3D toon, Retro anime, Pop art, Watercolor, Oil painting, Anime, Crayon, Comic and Sci-fi.
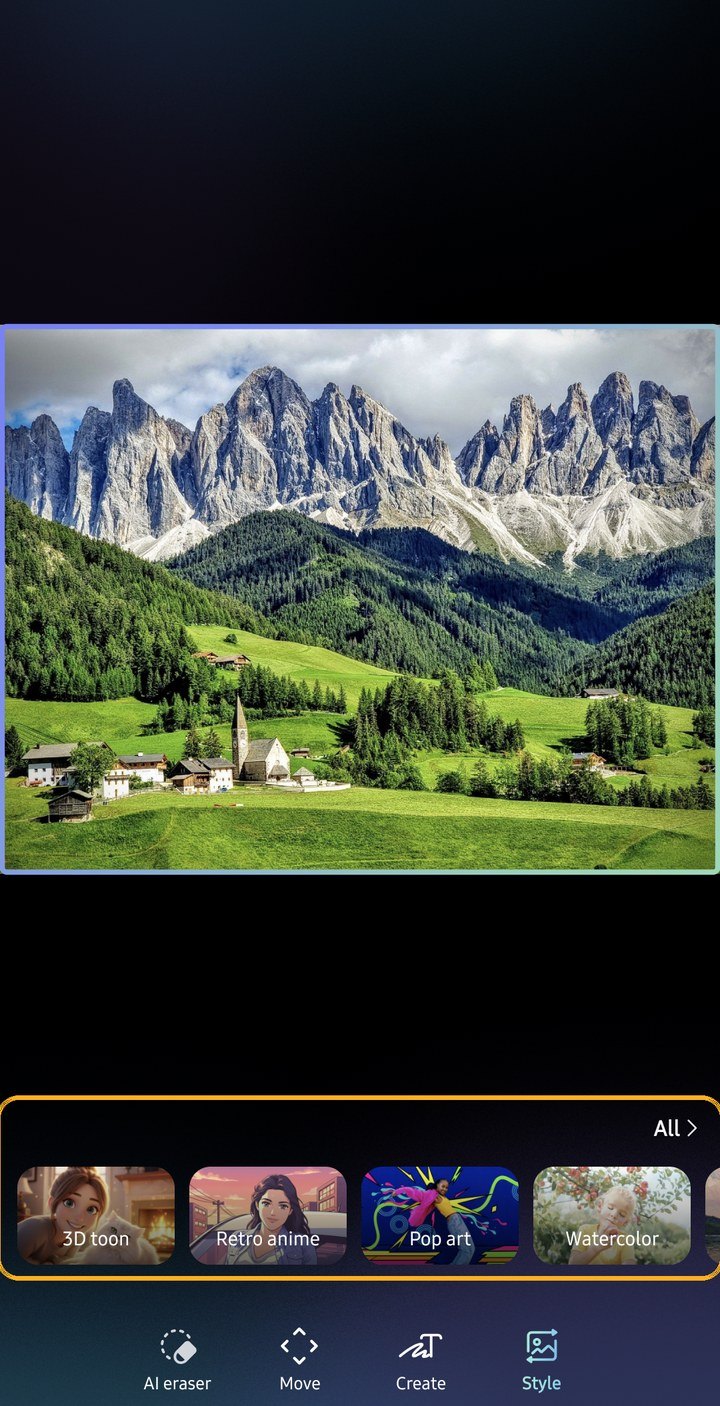
- 2
Generate and compare
We liked the Watercolor look for this picture of the Dolomites, so we tapped Generate. Show previous flips back to the original, and you can swipe for another version before you save the one you like.
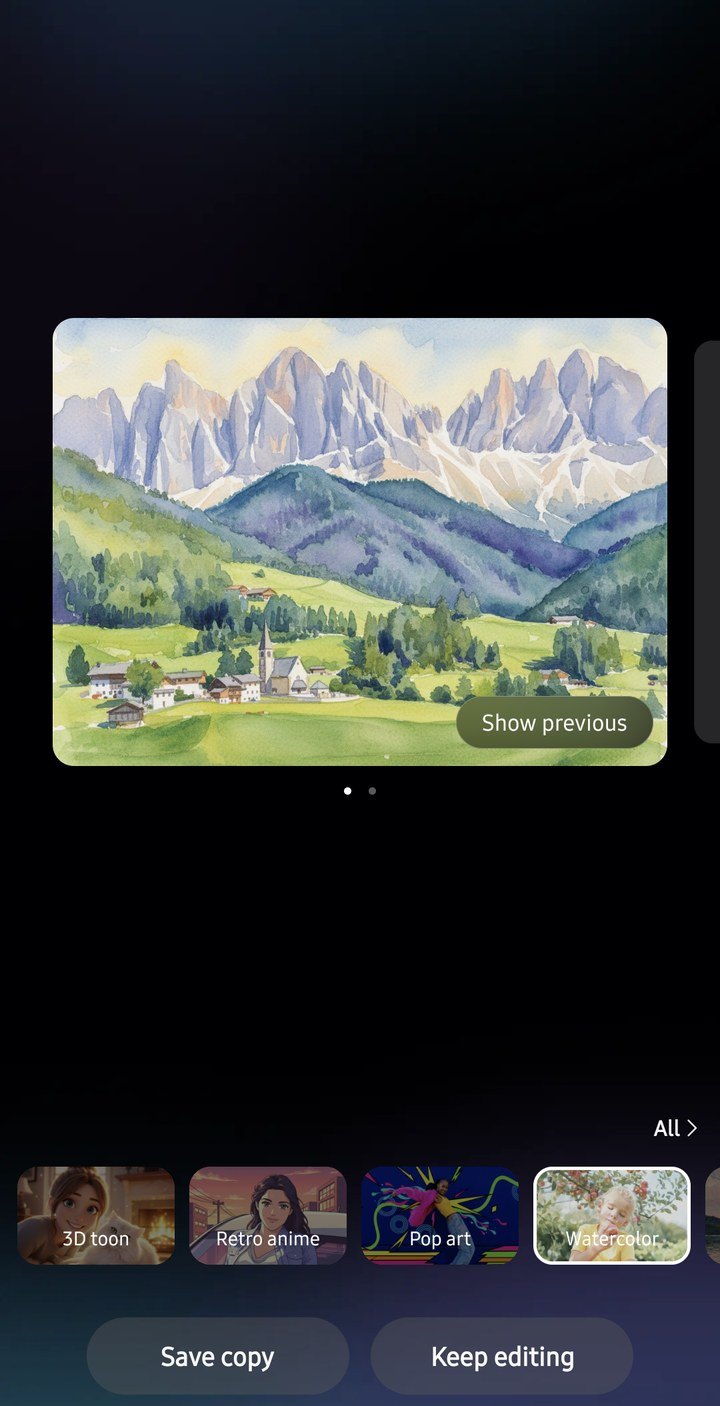


Samsung says Style can also create illustrated versions of photos of people, dogs and cats, the sort of thing previously available with Portrait Studio, but the photo should include an easily visible face. Our watercolour version came back at 1918 × 1399, compared with 1882 × 1440 for the original, so Style can change the framing slightly. The Portrait option didn't appear on our landscape photo. Samsung said in 2025 that Portrait Studio pictures are limited to 9MP, so we'd use them for sharing rather than printing.

The AI label, Content Credentials and the 12MP limit
Edited images, including a basic AI eraser edit, come with a watermark in the bottom-left corner that reads "AI-generated content" next to a sparkle icon. There's no way to opt out of it, and we wouldn't want to: it tells people what they're looking at. The files also carry Content Credentials (C2PA) metadata describing them as composites made with AI.
Photo Assist always saves a new photo instead of replacing your original, so the original stays safe. Samsung says images larger than 12MP may be resized to 12MP. Our AI eraser and Move results kept their size (1080 × 1440 and 1920 × 1440). Create and Style changed the framing slightly: from a 1882 × 1440 original, Create returned 1866 × 1451 and Style returned 1918 × 1399. For serious work, like large crops and prints, keep the original and use an editor like Lightroom or Snapseed.
Internet, account, privacy and price
Photo Assist needs a Samsung account and, for most tools, an internet connection. Samsung says the image you edit is processed but not stored. If you turn on Settings › Galaxy AI › Process data only on device, the cloud tools stop working, because Samsung says only some Photo Assist features run on the phone. You can switch Photo Assist off in Settings › Galaxy AI › Photo assist, which also has separate pages for AI eraser and Move, Create and Style.

There's a privacy option just for AI eraser and Move, too. Settings › Galaxy AI › Photo assist › AI eraser and Move has its own Process data only on device switch, which keeps those two tools on the phone instead of sending your photo online. We turned it on and erased the same passer-by and reflection again. The result was almost as clean as the online version, with the poster and doorway rebuilt slightly differently, and it still carried the AI-generated content label and Content Credentials.


Samsung told Tech Advisor on 11 November 2026 that core Galaxy AI features will stay free. A leaked Galaxy AI Premium plan suggests tools like Photo Assist could get usage limits, perhaps starting with the Galaxy S27.
Photo Assist, Object Eraser or another app?
- Use the classic Object Eraser for small things like litter, a sign or a power line. It runs on the phone, needs no internet and adds no AI label. On One UI 8.5 you turn it on in Gallery › Settings › Photo editor settings › Object eraser. On our S25 Ultra with One UI 9 it never appeared in the editor, and Tools › Tidy up offered only Shadows and Reflections. AI eraser's on-device switch (see above) erases offline instead, though it still adds the AI label.
- Use AI eraser for people and big objects, where you need the background rebuilt behind them.
- Use Move when the composition is nearly right, or to straighten a horizon without losing the corners.
- Use Create and Style for fun and for social posts, not for photos that have to show what really happened.
- Use Snapseed or Lightroom when you need full control over a fix, or a full-resolution file.

Frequently asked questions
Where is Photo Assist on my Samsung?+
Which phones have Photo Assist?+
Is Photo Assist free?+
Why does my edited photo say AI-generated content?+
Does Photo Assist work without internet?+
Does Photo Assist reduce photo quality?+
Keep reading

How to Use Object Eraser and Photo Assist on a Samsung Galaxy
Erase, move and resize things in Galaxy photos with Object Eraser and Photo Assist, see which phones get each tool, and what the AI watermark and 12MP cap mean.

Samsung Audio Eraser: Remove Wind and Noise From Videos
How to use Audio Eraser on a Samsung Galaxy: clean up wind, crowd noise and music in your videos, the real-time version for YouTube, and which phones get it.

What Is HDR? HDR Photos, Video and Screens on a Galaxy
What HDR means for photos, video and screens, how Samsung Galaxy phones use it automatically, and when to turn it down for a more natural look.

Golden Hour Photography: When It Is and How to Shoot It
What golden hour is, when it starts where you live, how long it lasts by season, and the Samsung Galaxy settings that keep its warm light.